How To Make A Coral Reef Sensory Bin
Create this Coral Reef Sensory Bin using homemade Kinetic Sand and Dyed Pasta! The perfect small world sensory play activity for kids of all ages!

Always supervise children during sensory play. See full disclaimer here. This post may contain affiliate links, which means I may earn a small commission if you make a purchase through these links, at no extra cost to you. As an Amazon Associate, I earn from qualifying purchases. I only recommend products I personally use and love! You can read more about my disclosure policy here.
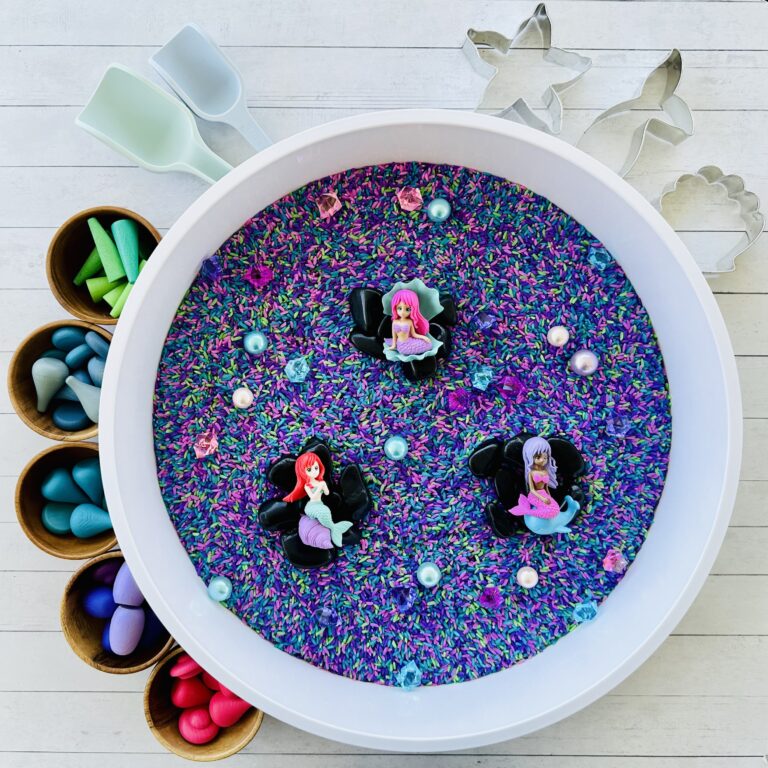
If you’re looking for a hands-on sensory adventure that brings the magic of the ocean to life, this Coral Reef Sensory Bin is just what you need! It’s a fun and engaging activity for kids of all ages.
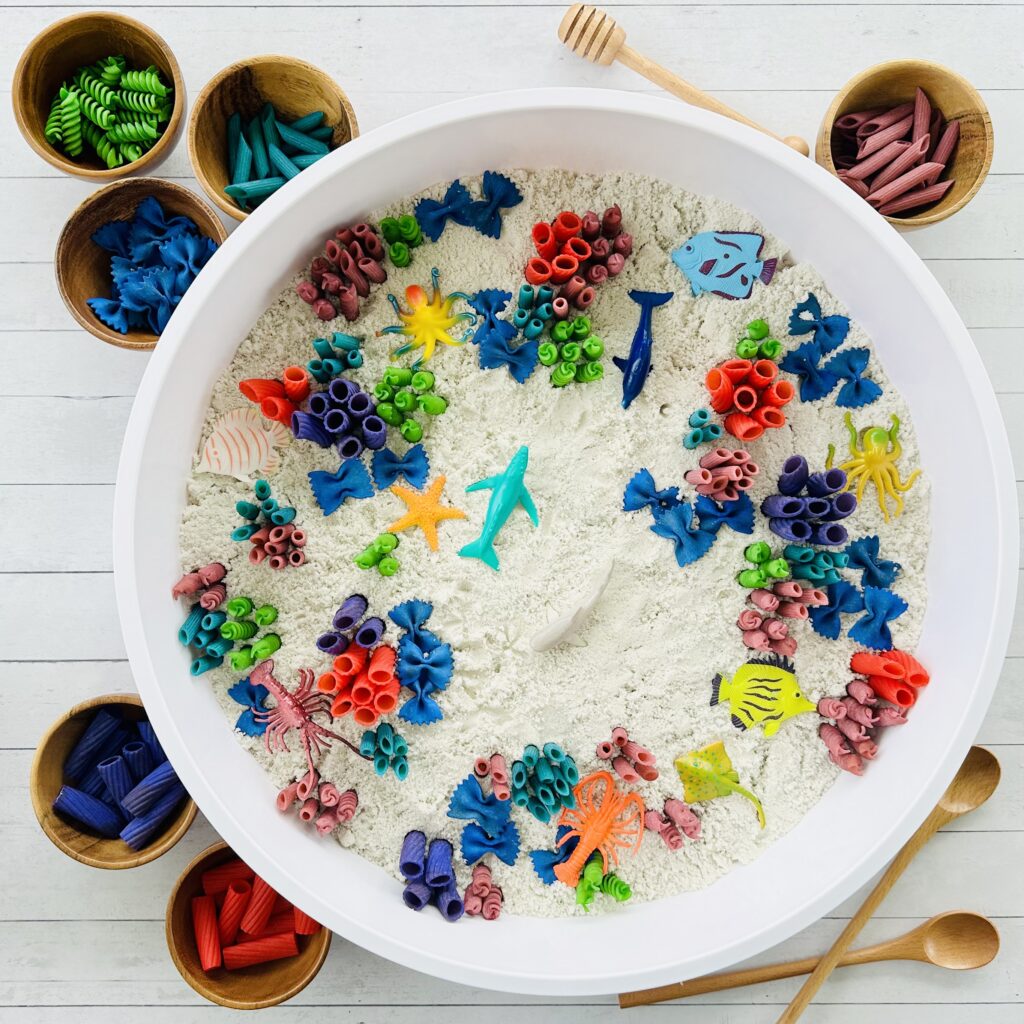
The coral reef is made from dyed pasta, adding a pop of color and texture to this underwater sensory experience!
We use homemade kinetic sand as the base, vibrant dyed pasta for the coral reef, and some ocean-themed trinkets to create an exciting underwater world ready for sensory play!
Why This Coral Reef Sensory Bin Is A Must-Try
If you’ve never made kinetic sand before, you’re in for a treat! It’s soft, fluffy, and silky to the touch but still holds its shape when pressed. It’s perfect for little hands to dig, scoop, and mold. And to make it extra special for summer, you can make the kinetic sand with ocean-inspired hues for that real beachy feel.
To bring the coral reef to life, we’ve added dyed pasta in gorgeous shades of blues, greens, pinks, and purples. The different shapes and colors mimic real coral, making the sensory experience even more immersive. Kids will love running their fingers through the kinetic sand, feeling the textures of the pasta reef, and diving into their own mini underwater adventure!
How To Make A Coral Reef Sensory Bin

What You’ll Need
Here’s everything you’ll need to make the dyed pasta:
- Dry pasta (Any shape will work! Go wild with different varieties to make it extra fun)
- Liquid food coloring or Gel food coloring (adjust to your desired intensity)
- Rubbing alcohol or vinegar (Rubbing alchohol is NOT taste-safe. Vinegar is taste-safe)
- Ziplock bags or a container with a lid (Something you can seal tight and shake around)
- Baking tray and parchment paper (To lay out the pasta for drying)
Here’s everything you’ll need to whip up a batch of kinetic sand:
- 2 ½ cups Play Sand (we used white play sand but any color works!)
- 1 ½ cups Cornstarch
- ½ cup Vegetable Oil
Extras for the sensory bin:
- Ocean Sea Animals, sea shells, or any ocean-themed toys
- Silicone Cupcake Liners or Small Bowls
- Scoops and Funnel, Tongs and Tweezers, Spoons, or cookie cutters
- Sensory Bin (or any container big enough for your child to play in).

Dyed Pasta Instructions
1. Mix Your Dyeing Solution
Start by adding the rubbing alcohol or vinegar to your bag or container, then add food coloring. The ratio for this is 1 tablespoon of rubbing alcohol or vinegar for every 1 cup of pasta. The more food coloring you add, the more intense the colors will be.
2. Prepare Your Pasta
Next, its time to select your dry pasta to dye. You can use any shape or variety—bowtie, penne, rotini, or even elbow macaroni. Feel free to mix different shapes for added texture and fun. Pour the dry pasta into a ziplock bag or a container with a tight-fitting lid.
3. Shake, Shake, Shake!
Once your pasta, liquid, and food coloring are all in the bag or container, seal it tightly. Now, it’s time for the fun part—shake it up! Keep shaking until all the pasta is evenly coated in the dye.
4. Let It Sit
Once you’re happy with the color distribution, let the pasta sit in the bag or container for about 30 minutes. This resting time allows the food coloring to fully absorb into the pasta. Give the bag a gentle shake every 5 minutes and flip it to ensure the color continues to distribute evenly.
5. Dry the Pasta
Carefully pour out any excess liquid. Then pour the dyed pasta onto a baking tray lined with parchment paper or wax paper, making sure to spread it out in a single layer. Depending on your environment, the pasta should be completely dry in 2-4 hours if you used rubbing alcohol, or 3-5 hours with vinegar.

Kinetic Sand Instructions
If you’re worried about younger kids putting it in their mouths, you might want to try making our Taste-Safe Kinetic Sand Recipe which uses food-grade ingredients.
1. Mix Dry Indredients
Add 2 ½ cups of fine play sand and 1 ½ cups of cornstarch into a mixing bowl. Stir well to evenly distribute everything.
3. Add Oil
Slowly mix in the ½ cup oil.
3. Mix It All Together
Use your hands to knead the mixture until it’s fully combined and has a soft, moldable texture. If it’s too dry, add a tiny bit more oil. If it’s too wet, sprinkle in a little more cornstarch.
4. Optional Extras
If you’re feeling fancy, now’s the time to add a few drops of essential oils for a lovely scent or a sprinkle of glitter for some sparkle.

Coral Reef Instructions
Once it’s ready, transfer the kinetic sand to a bin or shallow container. Now’s the time to get creative! Place your dyed pasta in the kinetic sand to create a coral reef. Toss in some ocean-themed trinkets, scoops, tongs, cookie cutters, or anything else for creative play.

Creative Play Ideas For Your Coral Reef Sensory Bin
You can do so many things with this coral reef sensory bin! Don’t be surprised if your little one spends a solid 20 minutes just running their fingers through it. It’s that satisfying! Want to take it up a notch? Here are a few ideas:
1. Underwater Bakery
Transform your sensory bin into an ocean bakery! With silicone muffin liners, cookie cutters, and small bowls, kids can shape kinetic sand into “sand cakes” or “coral cookies,” sparking creativity and fine motor skill development.
2. Sea Creature Creations
Use fish, shell, or starfish molds to make adorable ocean kinetic sand designs. Kids will love decorating their creations with mini sea creatures or coral pieces.
3. Sensory Treasure Hunt
Bury small ocean-themed trinkets or toys in the dough and let your kids dig them out using scoops or tweezers. It’s a fun surprise element that keeps them engaged!
Tips for Making the Most of Your Kinetic Sand
Why We Love This Coral Reef Sensory Bin
This kinetic sand coral reef sensory bin is a hit for kids of all ages. It’s easy to make and endlessly versatile for creative play. Plus, it’s an affordable way to bring a little extra fun to your Ocean Sensory Activities.
So grab your ingredients, mix up a batch, and let the underwater magic begin! Don’t forget to share your creations in the comments. I’d love to see them!!
Kinetic Sand Recipe
Equipment
- 1 Mixing Bowl
- 1 Mixing Spoon
- Measuring Cups
Ingredients
- 2 ½ cups fine play sand (any color works!)
- 1 ½ cups cornstarch
- ½ cup vegetable oil
Instructions
- Add 2 ½ cups of play sand and 1 ½ cups of cornstarch into a mixing bowl. Stir well to evenly distribute everything.
- Slowly mix in the ½ cup oil.
- Use your hands to knead the mixture until it’s fully combined and has a soft, moldable texture. If it’s too dry, add a tiny bit more oil. If it’s too wet, sprinkle in a little more cornstarch.
- Let the sensory play begin!
Recommended
- The Best Ocean Sensory Activities For Kids
- How To Make Taste-Safe Ocean Moon Dough
- How To Make An Ocean Colored Rice Sensory Bin
- How To Make A Chickpea Sensory Foam Ocean
- How To Make Ocean Fluffy Slime (No Borax!)
- How To Make Glittery Ocean Slime (No Borax!)
- How To Make The Best Jello Ocean Sensory Bin